Яндекс

Friday, December 29, 2017

Public Release 3.0

Hello,

Today is time to set new Release tag to master branch. Previous Public Release made year ago. Time to set the new milestone. Some statistics: since previous public release
* over 600 commits to master
* closed over 250 various issues

During the year I tried to describe main project's achievements. Lets make a brief retrospective:
  • The year started from a massive code refactoring. The source code changed drastically. Direct calls to graphics API totally removed from main code. Main code works with graphics via proxy class, which passes graphics call to a graphics back-end. Currently there is one back-end, which uses OpenGL. The refactoring allowed me and other developers to make OpenGL back-end dynamically adoptable for abilities of user's GPU. Thus, the same code works without recompilation for GL ES 2.0, GL ES 3.X, OpenGL 3.X, OpenGL 4.X. The more your GPU can do, the better and faster result you will get. With VAO/VBO support it became possible to use OpenGL core profile and finally port GLideN64 to MacOsX.
  • After the code refactoring I made major modification of frame buffer and video interface emulation. It was very large and complex work, but the results were rewarding. Fixed lots of old issues, the frame buffer emulation code became simpler.
  • Long awaited support for Resident Evil 2. The way this game programmed makes it hard to emulate on PC hardware. Many special code required to emulate it properly.
  • HLE fixes. Most users prefer to use GLideN64 in High Level Emulation mode (HLE), which not only runs much faster than Low Level Emulation (LLE) but also allows them to use widescreen mode and per-pixel lighting. HLE mode has its own issues caused by incomplete or missing implementation of game's microcode. Most of Nintendo microcodes are documented and their implementations work without issues. However, there are many custom microcodes, created by other developers. Documentation for these microcodes is not available for emu devs. To support custom microcode, its assembler code must be reverse-engineered. This work requires skills and patience. The first results in microcode decoding obtained in 2016, when Gilles Siberlin decoded microcode for Kuiki Uhabi Suigo. This year olivieryuyu, the main beta tester of GLideN64, decided to take microcode decoding task and step by step he achieved outstanding results:
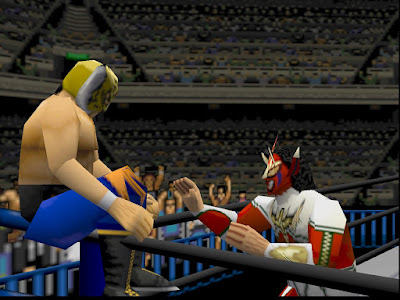
    • T3DUX microcode decoded. Last Legion UX, Shin Nihon Pro Wrestling Toukon Road - Brave Spirits and Shin Nihon Pro Wrestling Toukon Road 2 - The Next Generation now playable with HLE.
    • Custom lighting method used by Acclaim games decoded. Armorines - Project S.W.A.R.M., South Park, Turok 2 - Seeds of Evil, Turok 3 - Shadow of Oblivion now look much better with HLE.
    • F3DAM microcode decoded. This is custom microcode, which only one game uses: Hey You, Pikachu! Now this game is fully playable with HLE without major graphics issues.
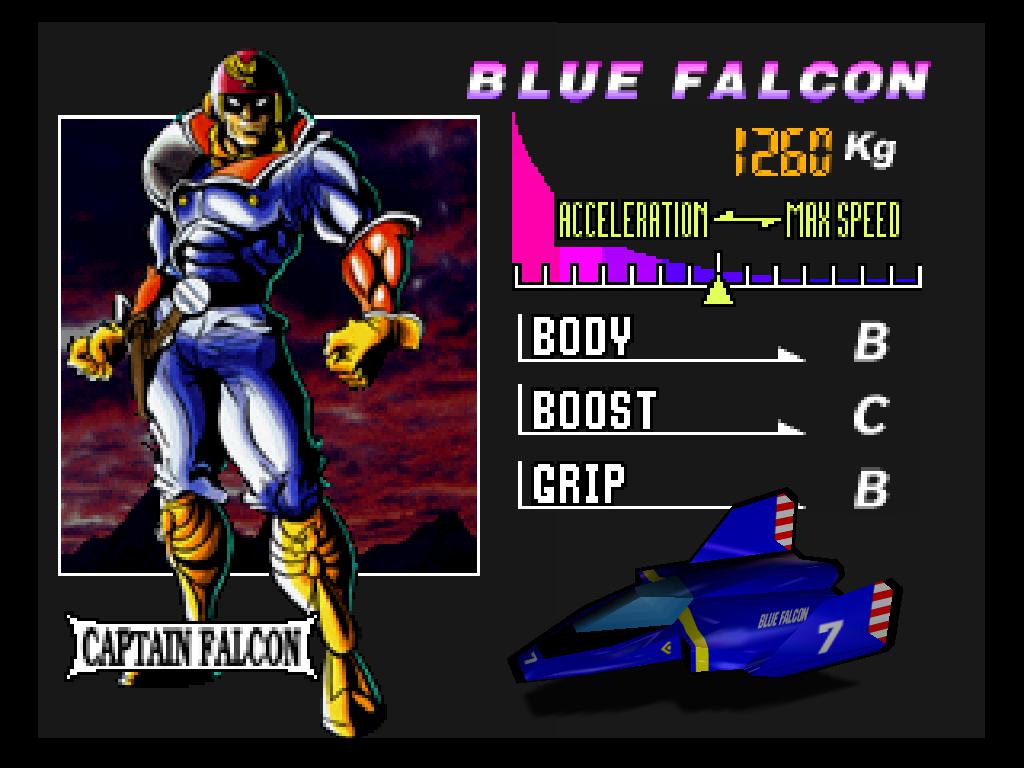
    • F3DFLX microcode decoded. This custom microcode is used to draw vehicles in F-Zero. With implementation of this microcode, the vehicles got reflection effect in HLE mode.
    • Zelda Majora's Mask point-lighting. This game uses custom lighting method, which graphics plugins developers could not properly implement for many years. Finally, olivieryuyu decided to decode it and he succeeded.
    • Star Wars - Rogue Squadron. This game was co-developed by Factor 5 and LucasArts. Factor 5 created very complex and very large microcode to port this game on N64. HLE implementation of the game was near impossible because of  amount of work necessary to decode and implement that microcode. This summer me and olivieryuyu decided to take it. We achieved first very modest results and started crowdfunding campaign on Indiegogo to support our hard work. Luckily, the campaign was supported and this support encouraged us in our efforts. The game became fully playable in HLE to the end of summer.
    Also, Gilles Siberlin has very promising results with HLE implementation of BOSS ZSort microcode for World Driver Championship and Stunt Racer. It should be ready to next release.
  • Of course, the number of changes is much larger than I could highlight in this blog. Among the most noticeable changes are:
    • Fixes in software depth buffer render made Body Harvest fully playable. The game suffered from problems with collisions detection.
    • Emulation of YUV-to-RGB color space conversion allowed to work with YUV textures without hacks and finally fix problems with Projectile Effects in Killer Instinct Gold.
    • Both Vigilante 8 games became playable after fixes with frame buffer emulation. There are still many glitches in menus, but at least menus are rendered. Game play looks ok.
    • Gauntlet legends now can boot in HLE mode and works without flickering. This result requires changes not only in graphics plugin, but also in core and RSP, and currently available only with mupen64plus. Thanks LegendOfDragoon for support of this game in GLideN64.
    • Many fixes made in GLideNHQ library, which responsible for texture enhancement and hires texture packs support.
Acknowledgements:
Very special thanks to olivieryuyu, who boosted HLE emulation forward this year.


Downloads:

To help the project:


HAPPY NEW YEAR!!! 

Monday, September 18, 2017

Zelda Majora's Mask point-lighting

Hello,

Problems with emulation of lighting in Zelda MM are almost as old as N64 emulation itself. Many developers (including myself) tried to fix it, but there is no solution, which works 100% correct. Finally olivieryuyu decided to decode it. The task is hard (otherwise it would be already done), but after successful decoding of Star Wars - Rogue Squadron microcode nothing is impossible. olivieryuyu decoded lighting method of Zelda MM. The lighting method is really complex. Not as insanely complex as lighting in Conker's Bad Fur Day, but definitely the second place. I started to implement it. WIP screenshot:


WIP build is available for patrons with early access: https://www.patreon.com/Gliden64

Math behind point lighting can be found in many places. Algorithm of point lighting in Zelda MM is close to one, described in this tutorial. Existing implementations of Zelda MM point lighting are close to the truth, but it has subtle and not obvious nuances, which hardly can be guessed without close examination of ucode's asm code.

To be short: olivieryuyu decoded Zelda MM point lighting code completely. It was a hard piece of work due to lots of math. I implemented it. The sources added to master in October. If you want to test it, download latest WIP build from GitHub.

Monday, September 11, 2017

F-Zero fixes. Patreon.

Hello,

I was on vacation after successful implementation of  microcode for Star Wars - Rogue Squadron. Now olivieryuyu and me continue to work on HLE issues. I just finished to work on issues in F-Zero. This game is playable, but two features were not emulated. They are:
reflection on vehicles during a race:
and red boarder around your vehicle in attack mode:


Reflections are missing only in HLE. F-Zero uses non-standard ucode F3DFLX to render vehicles. olivieryuyu discovered that this ucode has custom lighting routine. He spent a lot of time and efforts to decode it and finally found how it works. It is interesting and unique technique worth to describe it in details.

First, a short introduction to how N64 does reflections. Of course, N64 can't calculate true reflections on surfaces in real time. However, it is powerful enough to create pretty realistic effect of shiny metal surface, like this 
This effect requires special texture and special mode, in which texture coordinates for vertices calculated dynamically. Reflection texture is black picture with bright spot at its center, like this:

Special LookAt structure is used to calculate texture coordinates. LookAt structure consists of two Light structures, which contain only coordinates of 3D vector. This vector multiplied by transposed model matrix. Dot product of resulted vector with normal vector of vertex defines one texture coordinate. 2D texture has two coordinates. Thus, texture coordinates calculation requires, at first, two vertex-matrix multiplications and then two dot product calculations for each vertex. It is quite expensive set of calculations. Normally, if scene is complex, only few objects have reflection effect. In racing games, usually only player's car looks cool and shiny while other cars look more modestly.

In F-Zero all vehicles have reflections. While you can see one-two dozens of vehicles on screen at the same time, F-Zero is very fast game. Yes, vehicles models are very simple, but reflection calculation even for simple model is expensive. Normal reflection method could not work fast enough. Thus, F-Zero developers created custom reflection method, which works much faster than normal reflection.
We need calculate two texture coordinates to apply color from reflection texture. However, if we will use 1D texture, number of calculations reduced by half! N64 does not support 1D textures, but that can't stop crafty programmers. Since vehicles models are simple, we can do another optimization and does not use texturing for reflections at all. Instead of fetching texture color for each pixel we can set reflection color per vertex and use standard Gouraud shading. Texture mapping can be used for main vehicle's texture. That way we can apply both vehicle's texture and reflection in one step!

We calculated one texture coordinate in RSP, thus we can fetch reflection color from texture right on vertex loading. How it works: special command loads texture data into DMEM, memory space where microcode running.  Microcode calculates texture coordinate and uses it as index to fetch texel from texture in DMEM. But the problem is not solved yet. DMEM size is limited by 4kb, so it is expensive to keep color information in it. Besides, vertex already has color. Blending vertex color with texture color is not right kind of task for RSP, it is RDP task. We can't pass another set of colors with each vertex to RDP. But we have vertex alpha still unused. N64 usually uses vertex alpha as place for fog factor for opaque surfaces. Fog factor calculation depends on vertex Z and enabled by special flag in microcode. N64 blender mixes fog color with output of color combiner using vertex alpha as fog factor. This is exactly what is needed: lets texels of 1D reflection texture be factors for fog color, so they can be assigned to vertex alpha; then enable fog color in blender. Fog factor calculation flag must be disabled for this to work and the microcode disables it. In fact reflections on vehicles in F-Zero are not reflections but fog!


Red boarder problem is not related to microcode - it presents in LLE mode too. I tried to find, what is the source of that color. No components of color combiner equation have such color. I looked at blender and yes - blender uses blend color, which is set to bright red. However, force_blend flag set off. I supposed that when force_blend flag is off, blender is bypassed. I was wrong. force_blend off means that blender equation is not calculated, but first argument of blending equation is taken as result of blending. Usually the first argument of blender equation is color combiner output, so taking the first argument is equivalent to blender bypass. In case of boarder the first argument of blending equation is blend_color. That is blender ignores result of color combiner and outputs just bright red blend_color. I slightly corrected blender shader to support it.


Patreon

Donations are not necessary for project development but always welcome. I set project page on Patreon service to simplify donations process. If you like my work and don't mind to help the project, you may do it on regular basis now. Any sum is welcome. Small dollar is better than big thanks. As a reward you may choose early access to beta builds of the plugin with new features. Beta build with F-Zero fixes is available for patrons right now. Patreon page:
https://www.patreon.com/Gliden64
Promotion in social networks is welcome too.

Friday, August 11, 2017

Star Wars - Rogue Squadron HLE - finished.

Hello,

crowdfunding campaign on Indiegogo finished:

https://igg.me/at/swrs

Since the campaign reached the goal soon after start, the works started immediately. Now the task is completed: Star Wars - Rogue Squadron is fully playable in HLE mode.

Progress story:


 Final demo video:


As usual, you may download WIP build from GitHub.

If you want to support my work:

Saturday, July 22, 2017

Hey You, Pikachu!

Hello,

"Hey You, Pikachu!" is a funny game in 'virtual pet' genre. It can run with emulators, but you need to have original N64 hardware, which comes with that game: Voice Recognition Unit (VRU) and microphone. Also you need an adapter to attach that device to PC. You can't control your pet without that device. However, you can load the game with emulator without VRU attached. When you run the game with GLideN64 in HLE mode, you noticed various graphics glitches:


olivieryuyu has analyzed microcode for this game and found, that it is custom microcode named F3DAM. It is modification of standard F3DEX2 microcode. Besides voice-recognition specific code, it has modifications related to texture coordinates calculation and fog calculation. These differences causes the issues you can see on screen shots above. olivieryuyu decoded these modifications, I implemented them. All microcode-specific problems  gone:


If you don't have VRU device, but want to see how GLideN64 emulates this game: Daniel Eck made nice two hours translation of gameplay on twitch:
https://www.twitch.tv/videos/159911960


If you want to support my work:

Tuesday, July 4, 2017

"Star Wars - Rogue Squadron" crowdfunding campaign.

Hello,

Today top news is start of "Star Wars - Rogue Squadron" crowdfunding campaign on Indiegogo:

https://igg.me/at/swrs

Few months ago olivieryuyu and me started to work on decoding and HLE implementation of this game ucode. We spent many time and we got several good results. The task is really hard. I need your support and encouragement to complete it. This demo video shows current state of the project:


We want it to run fast and look as good as in LLE mode or better.

I have a request for GLideN64 users: I don't have accounts in social networks. Please help me to spread information about this campaign.


Update: The campaign reached the goal. Currently $625 USD raised by 25 backers. Thanks to all backers for the support! Alpha-build of the project is sent to all backers. Since the campaign is already successful, I'm continuing to work on the task. I hope, next alpha will show much more graphics.

Update 2: We just finished implementation of microcode command, which generates all terrain polygons in that game. Alpha build is sent to backers. Demo video:


Friday, June 30, 2017

Acclaim custom lighting.

There are four N64 games, which have the same issue in HLE mode: highlighting of some objects or areas is completely missing. Some area should be highlighted as result of explosion or shot from energy weapon, but nothing happens:

 The effect works ok in LLE


The games are: Armorines - Project S.W.A.R.M., South Park, Turok 2 - Seeds of Evil, Turok 3 - Shadow of Oblivion. All these games were released by Acclaim Entertainment Inc. This is suspicious coincidence. We found that all four games use the same ucode. String id of the ucode claimed that it is standard modification of F3DEX2. Analysis of lighting related commands showed that lighting method used by this ucode is not standard at all, but we did not find any documents, which could explain how it works.

The only way in this case is reverse engineering of ucode's assembler code. olivieryuyu, after success with decoding T3DUX ucode, decided to solve that mystery. He found, that the lighting part of the ucode has custom code indeed. That custom code activated only in special places in games, exactly where highlighting effect is missing.

Standard N64 lighting uses directional and ambient lights. Directional light has direction (vector with 8bit coordinates) and color. Ambient light has only color. Vertex color calculated as sum of colors of directional lights multiplied by light intensity plus color of ambient light. Light intensity depends on angle between light direction and normal to surface, which is kept in vertex.

Custom lighting method, which I called Acclaim lighting, works absolutely differently. Light structure contains position of light source in space (three 16bit coordinates), tree additional 16bit parameters and light's color. 16 bytes in total. Standard light structure has 12 bytes. Eight 16-bytes light structures loaded once at the beginning of display list, when highlight effect used. At first sight these structures have no relation to further rendering process. Game objects use the same vertices, which have the same colors. Lighting bit in geometry mode is switched off. Standard vertex processing method works as if no lighting is used, thus no highlighting effect.

olivieryuyu found geometry mode bit, which activates Acclaim lighting and decoded calculations used by this method. How it works:
  • For each light source calculate vector from light source position to vertex.
  • Calculate sum of absolute values of vector's x y and z coordinates.
  • If this sum is greater than some parameter (say A) in the light source structure, this light is ignored.
  • Light intensity is calculated as abs(sum - A) * B, where B is another parameter in the light source structure.
  • Light color is multiplied by light intensity and added to vertex color.
  • Final result is clamped to 1.
Thus, vertex color brightness can be increased, depending on vertex position. The algorithm looks like an approximation of point lighting. Standard point lighting uses length of vector from vertex to light source to calculate light intensity. Vector length is square root of sum of squares of vector coordinates. This method uses plain sum of vector coordinates.

I implemented Acclaim lighting in GLideN64. The problem is finally solved.


Side by side comparison video


If you want to support my work:

Friday, June 16, 2017

Toukon Road 1 & 2, Last Legion UX: HLE implementation

Hello,

As you know, there are several games, which does not work in HLE mode. Some games have major glitches, some does not work at all. These games use custom microcodes. We have no information about these microcodes and it is very unlikely that such information will appear someday. We still can run any game in LLE, but HLE is obviously faster. Thus, attempts to decode custom microcodes and improve quality of HLE emulation continue. The only way to do it is to analyse assembler code and try to understand what it does. It is very hard task, which only few people in the world can do (not me), so progress is slow.

olivieryuyu, the main beta tester of Glide64 and GLideN64, decided to take decoding task and already achieved great results. Recently he decoded microcode, which is used by Toukon Road 1 & 2 and Last Legion UX games. You can read details about it on wiki page:

https://github.com/gonetz/GLideN64/wiki/T3DUX-ucode

Cite: "Last Legion UX, Shin Nihon Pro Wrestling Toukon Road - Brave Spirits and Shin Nihon Pro Wrestling Toukon Road 2 - The Next Generation uses a undocumented Nintendo ucode called T3DUX.
Shin Nihon Pro Wrestling Toukon Road - Brave Spirits uses the version 0.83 and the two other games 0.85.
It is an evolution of the turbo3d microcode which is used only by one game in its original format, Dark Rift.
The major change in T3DUX compared to turbo3d is what we can called a colors & texture coordinates state."

From my side, I wrote HLE implementation of that ucode. Screen shots:


Last Legion UX ingame
Toukon Road intro
Toukon Road 2 intro

If you want to support my work:

Sunday, April 2, 2017

Resident Evil 2

Resident Evil 2 for Nintendo 64 is hard to emulate game. While the game uses standard ucode (or slight modification of standard one), it uses few non-standard tricks, which are hard to reproduce on PC hardware. I spent lots of time on this game when I worked on Glide64 plugin. Abilities of 3dfx graphics card allowed me to obtain pretty good result: the game was fully playable on Voodoo4/5 with some minor glitches. Later necessary functionality was added to glide wrapper, so you can run the game on any modern PC card.

What makes the game hard to emulate? As you know, the game consists of static 2D backgrounds with 3D models moving over. Background size may vary from place to place: someplace it is 436x384, someplace 448x328 and so on. Frame buffer size corresponds to background size. Video interface stretches image to TV resolution 640x480.

The first problem, which hardware plugin faces in this game is the way how background loaded to frame buffer. To optimize background load and rendering on N64 hardware, background loaded as image with width 512. That is 448x328 image is loaded as 512x287. The game allocates color buffer with width 512 and renders background with BgCopy command into it. In fact BgCopy works as memcpy to copy background content from one address in RDRAM to another. When buffer copy completed, the game allocates buffer with the same origin, but with width 448. Now buffer has correct proportions, and 3D models can be rendered over.

Why it is a problem for hardware graphics plugin? The plugin executes BgCopy command, which loads 512x287 image. It is no problem to create 512x287 texture and render it to frame buffer. The result will look like this:


If the background rendered right to frame buffer, that result can't be fixed. If frame buffer object is used for rendering, you may try to change size of buffer texture the same way as N64 changes size of color buffer. I did not find a way to change size of existing texture without loosing its content with OpenGL. glTexImage2D can change the size/format for existing texture object, but it removes all previous pixel data. Of course, it is possible to copy texture data to conventional memory, resize texture and write the data back, but it will be slow. If you know better method, please share.

There is fast solution of the problem: a hack. Value of video interface register VI_WIDTH is the same as actual width of background image. Thus, we can recalculate background image dimensions and load it properly:


I used that hack in Glide64 and I still don't know better solution. Unfortunately, it works only for HLE, because BgCopy is high-level command. For LLE we still need somehow resize buffer texture.

The next problem is depth compare. I already described the problem here and here, so I cite myself:
"Few games use scenes consisting of 3D models moving over 2D background. Some of objects on the background can be visually "closer" to user than 3D model, that is part of the 3D model is "behind" that object and that part must not be drawn. For fully 3D scene problem "object behind other object" is usually solved by depth buffer. 2D background has no depth, and depth buffer by itself can't help. Zelda OOT solves that problem by rendering auxiliary 3D scene with plain shaded polygonal objects, corresponding to the objects on the background. Thus, the scene gets correct depth buffer. Then the background covers this scene and 3D models rendered over the background are cut by depth buffer when the models are behind the original polygonal objects.
In Resident Evil 2 all screens are 3D models over 2D backgrounds. But the game does not render auxiliary 3D geometry to make depth buffer. Instead, the game ROM contains pre-rendered depth buffer data for each background. That depth buffer data is copied into RDRAM and each frame it is rendered as 16bit texture into a color buffer which then is used as the depth buffer. To emulate it on PC hardware the depth buffer data must be converted into format of PC depth buffer and copied into PC card depth buffer."

Glide64 was the first plugin, where the problem was solved. Copy values to depth buffer was relatively easy with glide3x API: glide3x depth buffer format is 16bit integer, as for N64. I could load depth image as 16bit RGB texture, render it to a texture buffer and then use that buffer as depth buffer, exactly as N64 does. OpenGL could not do it, but glide wrapper authors also manged to solve that problem. It was kinda hackish, but it works.

GLideN64 uses another solution. I invented it for NFL Quarterback Club 98 TV monitor effect. It is described in details in my Depth buffer emulation II article. Depth image is loaded as texture with one component RED and texel format of GL_UNSIGNED_SHORT. When the texture is rendered, fragment shader stores fetched texel as its depth value. Depth value from fragment shader passed to depth buffer, exactly as we need.

So, we have color background and depth buffer correctly rendered. Victory? Not yet. Depth buffer compare works, but not always. Here it works ok:


but if I step behind it looks like this:


Where is the problem? The problem is in the way N64 depth buffer works. N64 vertex uses 18bit fixed point depth value. N64 depth buffer stores 16 bit elements. N64 uses non-linear transformation of 18bit vertex depth value to 16bit value, which will be used for depth compare and then kept in the depth buffer. OpenGL uses floats for vertex depth and for depth buffer, but it is incorrect to directly compare GL depth component with value from N64 depth image. First, the same transformation must be applied to vertex depth. Fortunately, necessary shader code was already written for depth based fog, which Beetle Adventure Racing uses. I reused that code and finally got perfect result:


If you want to support my work:


Saturday, April 1, 2017

Major modification of frame buffer and video interface emulation.

I already wrote about N64 Video Interface emulation in GLideN64. It was my first attempt to make things right. Three years passed. Many elements of frame buffer emulation mechanism have been modified since that time. However, one major problem remained. This problem is as old as N64 emulation itself. This is "frame buffer height" problem.

To render anything you first need to allocate rectangular buffer, which will hold your graphics. You need to know width and height to allocate the buffer. The problem is that RDP command SetColorImage set only width of color buffer. Height is not set. RDP does not need to know buffer height. SetColorImage provides buffer origin, number of pixels per line and size of each pixel in bytes. This is enough to calculate position of vertex with given X and Y coordinates within the buffer. Scissor command prevents out of buffer writes. Software graphics plugin works exactly as RDP and also does not need to know buffer height. Hardware plugin is in trouble. Suppose, we selected 960x720 resolution with 4:3 aspect ratio and created 960x720 render buffer in video memory. N64 game allocates buffer with width 320. Which scale should we apply to original N64 coordinates to get correct picture in our render buffer? Since 960 = 3 x 320, it seems that correct scale is 3x. That is we scale original N64 X and Y coordinates by 3 and get picture in our buffer. Will this picture be correct? Only if original buffer also has 4:3 aspect, that is has size 320x240. In reality, it also can be 320x220, 320x256 or even 320x480. In all these case 3x scale for Y will give us wrong result. To get correct Y scale we need to know height of original buffer, but it is not available.

Height of N64 render buffer can be estimated from parameters of Video Interface, which defines how color buffer will be mapped to TV screen. All hardware plugins, which I know from inside use this possibility. Thus, frame buffer allocation becomes dependent on VI registers. This dependency does not exist in N64 itself. The height estimation does not guarantee to be always correct, and in fact it is often incorrect. The estimation code is complex and full of heuristics, to reduce numbers of errors. Nevertheless, this tie still induce many issues, in particular with PAL games and with games, which use interlaced TV modes.


Besides main color buffers, whose content is displayed on TV, N64 games often use auxiliary color buffers. These buffers are used for variety of purposes: dynamic shadows, reflections, TV monitors and so on. Auxiliary color buffer can be of any size. Thus, estimation of auxiliary buffer height is complex and fully heuristic algorithm, which also not always works right. Wrong height lead to visual glitches.

At the end of 2016 I finally invented the way to get rid of necessity to know exact height of  N64 color buffers. The idea is actually very simple. Why RDP does not care about buffer height? It knows that the height is large enough and just fills the buffer with primitives. Video Interface takes necessary part of the buffer and maps it on TV screen. Auxiliary buffers are used as textures: game's program code knows buffer's bounds and maps texture coordinates to its content.
My frame buffer mechanism creates separate frame buffer object in video memory for each buffer allocated by RDP. I used estimated height to create the buffer render target. It caused aforementioned issues when estimation heuristics failed and produced wrong result. So, the idea is to not use estimated buffer height and always use large enough height instead. 'Large enough' should be taken literally. It is some value, which is surely greater or equal to any possible height of N64 buffer. There are some natural limitations: maximal buffer size for NTSC is 640x480 and 640x576 for PAL.
Since I know width of rendering resolution selected by user and I know width of N64 rendering buffer - I know how to scale original coordinates of N64 vertices. This scale can be applied for X and Y coordinate, no matter has the N64 buffer the same aspect as user selected screen resolution or not. Video Interface emulation will map my frame buffer object to screen the same way as N64 Video Interface maps N64 buffer in RDRAM to TV screen.

Pros:

  • No more buffer height estimation heuristics.
  • No more glitches caused by wrong height estimation
  • Emulation of effects, not working before
Cons:
  • More video memory needed. Memory overhead is not large for main buffers, because actual buffer height is usually close to natural limit used as Large Enough Height. Memory allocated for auxiliary can be 10 times more than actually used.

While the idea is simple, its implementation was not.  It was obvious, that lots of things need to be changed. The first step was code refactoring, mentioned in the previous article. After that step I got more clear and easy to modify code. It was not enough though. Some preliminary steps had to be done first.

There is one OpenGL specific problem with emulation of N64 graphics. N64 uses coordinate system with origin in upper left corner. Glide3X API allowed to set origin to either upper left or to lower left. So, when I worked on Glide64, I set origin to upper left and had no inconveniences. OpenGL has origin nailed to lower left corner. If you will use N64 coordinates, you will get image upside down. Thus, Y coordinate must be inverted. (0,0) coordinate translated to (0, maxY), where maxY is buffer's height.


It is simple trick, but you need to apply it everywhere: modify vertex Y, viewport Y, scissor Y. Read from frame buffer to RDRAM have to be done in reverse order. Things could get even more complicated with new frame buffer technique. Thus, I decided to remove Y inversion. Of course, image will be upside down in that case.


However, the image is in frame buffer texture, which I can map to screen as I need. So, it is not a problem. The problem arises when you do not use frame buffer object and do rendering right to back buffer. GLideN64 renders right to screen when frame buffer emulation disabled. I did not want to keep Y inversion code to support "no frame buffer emulation" mode. My goal was to simplify things, not to make them more complex and intricate. Thus, I decided to slightly modify "no frame buffer emulation" mode: use one frame buffer object for rendering instead of direct render to back buffer.  It also mentioned in previous article: "Anti aliasing without frame buffer emulation". After that modification I could safely remove Y inversion code.

After preliminary work completed, real challenge started. Implementation of my idea was a very hard task.  Frame buffer emulation was twisted tight with VI emulation, and I spent many time untangling multiple knots and fixing weirdest glitches. At the end I was totally rewarded. Issues with cut image in PAL games gone. Issues with screen shakes in interlaced mode gone. Many crashes with buffer copy to RDRAM gone. VI effects started to work more smooth. Screen shrink VI effect in Mia Hamm Soccer finally start to work properly.


Saturday, March 25, 2017

Project news

Hello,

Three month passed since the latest Public Release. Time to report about most noticeable changes.

Massive code refactoring


GLideN64 currently supports the following graphics API: OpenGL, GLES2, GLES3, GLES3.1
OpenGL support also divided on GL 3.3 and GL 4.3+. API functions called directly from any place in code. It causes the following problems:

  • The code contains lots of GL version - specific code, separated by #ifdef (or if() for OpenGL versions)
  • Android emulator distributes 4 GLideN64 binaries for each supported CPU family. 

I refactored GLideN64 code to totally remove direct calls to graphics API from main code. All core GLideN64 classes use special proxy class graphics::Context to manipulate with textures , shaders, buffers and so on, and to draw objects. Context passes calls to back-end class. Currently there is one back-end, which uses OpenGL. If somebody wants to add Vulkan API or DirectX API support, it can be made much easier now: just write new back-end.

OpenGL backend designed as dynamically adoptable for available GL version. It may use different functions for the same task. For example, if available GL supports glTexStorage2D the new texture will be initialized with glTexStorage2D and with glTexImage2D otherwise.

Another example is polygons drawing. Core OpenGL 3.3 requires to pass vertex data from application to GL via Vertex Buffer Object (VBO). GLideN64 used immediate mode rendering with data stored in client side arrays. Thus, it could not use core profile. New back-end implements primitives drawer, which uses VBO and supports core profile. However, we found that many Android devices work better with old immediate mode rendering. So, the back-end also has primitives drawer, which uses immediate mode. Back-end decides which drawer to use in run-time and does it transparently to main code.

The amount of code changes was huge. I totally rewrote many parts of code. As the result, the code is much more clean now. Logan McNaughton and Francisco Zurita helped me to tune the back-end and select most effective GL functions for each GL version. In most cases refactored code works as fast or better than before refactoring. Android port now uses only one binary for all versions of GL ES.

VSync support


GLideN64 version for Zilmar-spec emulators does not support vertical sync. I thought that necessity in that option gone with analog monitors. However, users asked me to add it, because they experienced tearing on their monitors without it. VSync is not part of OpenGL specifications. Use of WGL extensions required to enable it on Windows. I haven't time for it until recently. The code refactoring made it possible to use OpenGL core profile on Windows. Core profile also requires use of WGL extensions. I made necessary changes. Adding VSync support was a matter of few lines after that. Ryan Rosser added new control to the GUI.

MacOsX port


While GLideN64 successfully works on Linux and Android, Mac port was impossible until now. Mac OpenGL driver requires from application to use core GL profile if it needs to work with OpenGL 3.3 or above. That implies VBO support. GLideN64 did not support VBO until the refactoring. I made new attempt to port the code to MacOsX after refactoring completed. This attempt was successful:

I don't know how well the port works: I have no Mac. I got remote access to Mac mini via command line and just made code compilable. The video provided by Brent Woodruff, who built plugin from sources and run on his Mac.


Anti aliasing without frame buffer emulation


Frame buffer emulation is enabled by default. It can be disabled, but it also disables many features, including anti aliasing and gamma correction. This is because anti aliasing and gamma correction requires rendering with Frame Buffer Objects (FBO), which is enabled only with frame buffer emulation. I changed it: now plugin always uses FBO for rendering. This made possible to use anti aliasing and gamma correction even when frame buffer emulation disabled. This was done as preliminary step for another large code refactoring, which I will describe next time.


Donations


Donations are welcome. Two options are available: Yandex Money (the form above) and PayPal: https://www.paypal.me/SergeyLipskiy. Both methods work well, my thanks to people, who used them. Also, does anybody know how to place my paypal.me link as widget/gadget on blog layout? I'm helpless in web design. Another side note: it seems that my mail server has problems with sending mails to AOL mailboxes. I tried to say thanks by email, but it probably was not delivered.